Tuesday, May 31, 2011

That Bulgar Keema Thing


So far I've been trying to post some of more tried and true recipes, or even items like the French Silk Pie which was someone else's recipe and basically I documented my experiences with it.  (All good, by the way.)

However, that is not how I usually roll in the kitchen.  Tonight's dinner was more typical.  Leaving the office and walking to my car I thought to myself, "I really need to cook or freeze that ground beef that's in the fridge."  This was soon followed by "Ugh.  Why do I buy ground beef?  I make the same boring stuff with it ... burgers, spaghetti sauce, meatloaf.  AGH!"  And I trudged along for half a block and then thought, "Wait a minute.  Indian cooking uses a lot of spiced ground meats.  So does Turkish cooking and ... well, wow, there's just a whole lot of options out there that would be so much more interesting."

By the time I got to my car I was rifling through my pantry in my head, determined not to stop at the grocery store for anything.  What would it be good with?  Oh, I know, I have bulgar wheat!  And I could use that lemon juice, olive oil, cinnamon dressing that I do ...  oh wait.  No lemon.  Ah-hah!  But I have limes!  And fresh parsley!

And so it went on the drive home.  By the time I got into the kitchen I was in full wing-it mode, talking to myself as I poked around in the fridge and cupboards.  Oh look!  There's that baby spinach salad I got the other day for lunch and never ate.  That would go great chopped up with the parsley.  Ah, and a quarter of a red onion.  What's this?  A can of chickpeas?  Perfection.  Oh, and next to the lime is one sad looking tomato that really needs to be cooked in something.  Peachy!  Chicken stock in the fridge.  Yay!

The end result was pretty much a keema mixed with a bulgar pilaf.

I'm going to try to capture it here for myself (and my husband who kept saying "This is really good!" every third bite), and for anyone who would like an idea of how I usually roll.

The Stuff...

...for the bulgar.
1 Cup bulgar wheat
1 1/2 Cups good quality chicken stock (not broth, stock)

... for the keema.
1/3 lb of good quality ground chuck
1/2 C canned (or cooked) chickpeas (aka garbanzo beans)
1 medium ripe tomato, chopped
2 cloves of garlic, crushed into a paste
1 inch of ginger, crushed into a paste
1/2 tsp ground cayenne pepper (or more or less depending on your heat tolerance)
1/2 tsp ground cumin
1/4 tsp ground coriander
1 tsp garam masala
Salt and black pepper to taste

... to make it a pilaf.
chopped baby spinach
raisins (or currants or dried cranberries...)
chopped red onion
chopped fresh parsley
anything else that you think would be yummy. 

Like chopped green olives?  or chopped toasted almonds or pistachios?  pine nuts? Ooo... next time, yah yah.

... to dress it all up.
1/4 C good quality extra virgin olive oil
juice from 1 lime
salt and pepper


The Way with some Ideas thrown in.
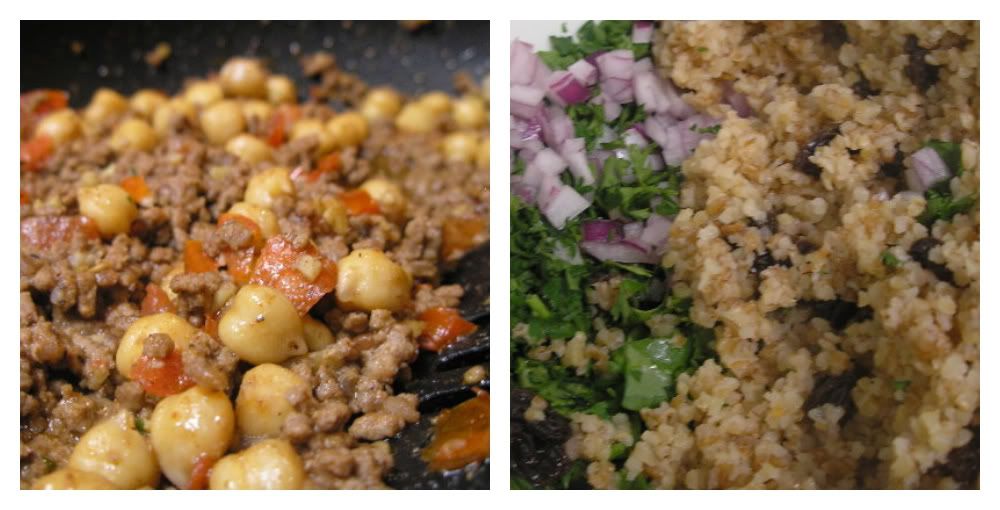
In a medium saucepan heat the stock to a boil and pour in bulgar wheat.  Return to a boil, cover with a tight fitting lid and turn heat very low (gas) or off (electric).  Leave it alone for 10 - 20 minutes depending on your bulgar.  Alternatively, follow the cooking directions on the package if you bought it that way.  I find most commercial bulgar cooking directions call for too much liquid and produce a cooked cereal thing not a pilaf thing.

Saute garlic, ginger, ground beef, cayenne, cumin and coriander until beef is browned.  Add chickpeas and tomatoes.  Cook until tomatoes are softened and all the flavors have had a chance to meld.  Maybe 5 minutes.  Add garam masala and stir.

Toss any dried fruit you may be using on top of the cooked bulgar and put the lid back on it to let it steam for a couple of minutes.  The drier the fruit, the longer the steam.  You don't want it mushy though.  Fluff the bulgar before adding it to the other ingredients.

In a small bowl, whisk olive oil and lemon juice together until emulsified (this is seconds if you have a good whisk).  Add salt and pepper to taste.

In a large bowl, combine all your chopped fresh veggies and herbs with the bulgar mixture and beef mixture.  Toss it together.  Drizzle with the olive oil dressing and toss again.
 

Taste it.  Adjust taste with salt and pepper.  I found mine needed a little something and concluded that it wasn't more salt, but rather a little sweet - which often fixes a salt problem when you find yourself adding more salt and more salt and more salt and not getting what you're after.   So I drizzled on a little agave nectar (honey would work) and that did the trick.

I served it up on bright red soup plates and topped it with a green olive.  This made enough for my husband and I to both have it for dinner, and I would say there are probably 4 servings left.  At least some of it's going to the office with me for tomorrow's lunch.


Also ... this whole thing was concocted, served and eaten within 30 minutes.  Definitely a workable work night dinner. Also a testament to how fast we can inhale food around here.

Monday, May 30, 2011

Crusty Crostini


Everything is on crostini lately, and food magazines yell at me that I must follow their secret to success, usually involving a grill, if I want my parties to be the talk of the season.  Thankfully, I'm not worried about being the talk of anything and I watched Julie & Julia so I know that you can make heart breakingly yummy food on a small stove in a cramped apartment.

When it comes to cooking, I am inspired by an unpredictable assortment of books, movies, sights, scents ... in the case of crostini, I was enchanted with the scene where Julie is making grilled bread in a cast iron skillet on her stove.  The colors were so vibrant, the technique so simple, the equipment something I already had, the end result mouthwatering.

And I thought: Hey, I can do that!

And I did.


The Stuff
Good quality bread (and I don't mean Pepperidge Farm sandwich!)
Olive oil and/or butter

The Way
Slice the bread into @1/2 inch slices - thick enough to be sturdy, thin enough that you won't have to dislocate your jaw to get a mouthful of the bread plus toppings.
Heat a cast iron skillet (oh, okay, any skillet, really) over medium heat.
Brush both sides of the bread with olive oil (or a combination of olive oil and butter).
Snuggle bread slices into skillet and cook on each side until golden brown with some dark brown almost burnt parts.
Serve topped with your choice of yumminess.

Ideas
Rub a halved clove of garlic over the hot, crunchy bread before topping.
Don't bother topping it at all and just inhale.
Top with...
     fresh mozzerella, basil and tomato.
     chopped tomatoes, roasted red pepper, minced onion.

Talk back: What's your favorite topping?

Sunday, May 29, 2011

Rosemary Chicken Dinner


Years ago I picked up a cooking magazine that featured a "French roast chicken dinner" on the cover.  I don't know if I ever cooked the dish according to that recipe or not, but I do know that the ideas took root and became one of my "go to" dinners. 

This is one of those mindless throw-it-all-in-the-oven dinners that fills your home with heady aromas, hits the table looking like a million bucks and causes that most sought after of responses ... the pause, the groan, and then the deep silence of what our family calls "happy eating sounds."

So, without further ado, I present to you my Rosemary Chicken.

The Proportions
1 chicken, cut-up (or one cut up chicken, however you like to deal with it)
4 medium sized russet potatoes, peeled and cut into 2 inch chunks
1 large white onion, minced
2 tsp salt
2 tsp black pepper
2 Tbs fresh rosemary
1 Cup white wine

The Method
Preheat oven to 400 degrees.
Mix minced onion, salt, pepper, potato chunks and chicken pieces together in a large oven proof pan.
Bake chicken and potatoes at 400 degrees for 20 minutes, or until chicken is just starting to brown.
Add white wine to chicken and cover with foil.
Lower oven temperature to 350 degrees.
Bake for 30 - 45 minutes or until chicken is cooked through. 
Remove foil.
Bake for another 20 minutes or until chicken is a deep golden brown and sauce has reduced.


The Tips
Can we talk chicken here for a minute?  The spongy white @#$% sold in our grocery stores isn't worth the price (no matter how low) you pay.  It's crammed with pesticides, antibiotics and hormones but even worse - it's tasteless!  It's been processed by being submerged in ice cold water until it's completely water logged and then frozen for shipping.  Is it any wonder that it resembles its styrofoam packing?  Even if you can't afford or find true free range organic hens, I do recommend that you seek out something like Smart Chicken that is air chilled instead of drowned in dirty water.  It really will make a difference.  By the way, if you haven't ever worked with a "real" chicken before?  Yes, the fat is supposed to be bright yellow, the breast meat is supposed to be a dark pink and the thighs really are meant to by that ruby color.

So ... anyway.  Buy good chicken.  Please.

Fresh herbs.  I'm not even going to say more.  Except that sure, I've made this dish with dried rosemary any number of times.  It's yummy.  Fresh herbs are just better, that's all.

Potatoes?  I listed 4 russet potatoes because that's what I had when I made this tonight.  There were sort of sad so I peeled them.  It could just as easily be 8 red skins, skins on and halved.  Or 12 baby potatoes.  Or whatever floats your potato boat.  It's going to get coated in chicken fat, salt, pepper, rosemary and white wine.  It's kind of hard to go wrong.

A few last thoughts - make sure that your baking dish is large enough that the potatoes and chicken fit in a single layer without being too crowded.  I use a huge skillet that is also known as my chicken frying skillet (we'll get to that one day).  I got it from my Mom.  She got it from her Dad.  He made it, or so the story goes.

You can substitute chicken stock for the white wine if you prefer not to cook with alcohol (although all the alcoholic content bubbles off).  Just remember one thing.  Skip or significantly lower the amount of salt you use if you're using stock in place of wine.  It's best to realize you don't have any white wine in the house after all BEFORE you add the salt ... just ask my son Michael.  He'll take great delight in telling you exactly how inedible the end results are if you don't adjust the salt for using stock instead of wine!

Tuesday, May 24, 2011

Chocolate French Silk OhMyGoodness!

My fabulous brother and his family live and work in Honduras.  I don't.  As a result, our time together is too short and too infrequent.  This past weekend I had the pleasure of hanging out with my brother for a little more than a day - unexpected and very treasured time with him.  Of course, I simply had to make sure he got a slab of French Silk Pie crammed into his visit since it's one of his favorite things. 

Before I launched into an epic French Silk Pie making event though, the wisdom of my age suggested I make sure that's the way he wanted me to spend my time during his visit.  The discussion went something like this...

Me: I was thinking of making a French Silk Pie while ..
Him: OH-KAY!

Okay.

So I went hunting for a real French Silk Pie recipe.  Having never made one before, and having enjoyed some good ones and many mediocre ones, I was convinced that this would be a complex and time consuming cooking challenge.

Um.

NOT.

If you're a freak about eating anything with raw eggs in it, I suggest Cook's Country version with a cooked custard.  Yes, you will need a subscription to get to the recipe with that link.  I haven't tried it, but I'm offering it as an option because I've never made a recipe from the Cook's family that didn't rock.

I used a recipe I found just googling and contemplating the recipes.  This one is from Suite101 and can be found here.  For your convenience, it's duplicated below:

The Proportions Part One
3/4 cup butter, softened
1 cup white sugar
3 one ounce squares unsweetened baking chocolate, melted
2 tsp pure vanilla
3 large eggs

The Method Part One
Melt chocolate in a small bowl over hot water. Do not let the chocolate harden up.
In a large mixing bowl, cream the butter at medium to high speed about 1 minute.
Add sugar, 1/4 cup at a time and continue to beat until light and fluffy. This will take 3-5 minutes. Scrape bowl often. It must be mixed long enough so it is no longer gritty.
Slowly add the melted chocolate to the butter mixture, beating on low to medium speed until the chocolate is well blended and mixture is smooth and creamy. Scrape again.
On medium speed, add eggs one at a time, beating after each one before adding the next egg.  Scrape bowl.
Add vanilla and give it one more mix.
Spread into prepared pie crust. 
Set aside.

The Proportions Part Two
1 cup heavy whipping cream
1/4 cup powdered sugar
1/2 tsp pure vanilla
Chocolate curls, optional for garnish

The Method Part Two
In large mixing bowl, beat cream until it sets up. There is no way to explain how long this will take. Every mixer is different. It should be light and fluffy and look like soft whipped cream. Do NOT let it get to the butter stage which can happen very quickly. If in doubt, under mix. You can always whip it a little more after the sugar is added.
Add powdered sugar and and vanilla and beat until fluffy and stiff. Do not over beat.
Put whipped cream into a pastry bag fitted with a large star tip and decorate the pie. Or pile the cream on high with a spatula.
Sprinkle with chocolate curls.
Refrigerate pie and any leftovers.

The Tips
The recipe itself includes some good tips, especially when it comes to getting the filling smooth and not turning your whipped cream into butter.
I would add that use of superfine sugar instead of regular sugar will contribute to a smoother filling.  However, I used regular sugar and beat the living daylights out of it and finally gave up on the gritty ever going away.  By the time I added the melted chocolate and the eggs, the filling was smooth as ... well ... silk.  In retrospect, I might not have had to mix the butter/sugar combo as long as I did but hey, that's one place where it's more than okay to overmix.  Air is good.
A word about mixers.  If you have a weeny, underpowered hand mixer this pie might take a while to achieve that cloud-like, perfectly smooth, chocolately goodness.  If you have a good stand mixer, it will be easier.  If, like me, you are blessed with owning a KitchenAid Professional 600 series mixer then this pie is as easy as falling off a log and will pretty much make itself in a matter of minutes.
About the crust... every recipe I've looked at tells you to put this in a regular pre-baked pie crust.  Why?  Why oh why oh why?  Doesn't this just scream out for a chocolate cookie crust?  (The answer is, "Yes, Marie, it does. Why didn't the rest of the cooking world realize this sooner?  Thank you for saving us from this culinary tragedy.") 
So, I made my first Chocolate French Silk Pie using a chocolate wafer crust.
The Proportions
32 chocolate wafers (e.g., Nabisco Famous Chocolate Wafers)
3 tbsp butter
The Method
Heat oven to 350 degrees.
Crush chocolate wafers.
Melt butter and blend with the crushed wafers.
Press into pie pan.
Bake for 6-8 minutes.
Cool.
A Few More Tips
A food processor makes crushing the chocolate wafers a snap.  You can also just keep the processor running and drizzle the melted butter into it.  You will end up with something that looks like wet coffee grounds and makes the most delicious chocolate crust.
The bottom of a measuring cup is a perfect tool for pressing crumb crusts into a pie pan.
You don't have to use exactly 32 wafers.  I think I used 35.  Or maybe 30.  I don't know ... I ate some along the way.

Tuesday, May 17, 2011

Hush, puppy!

There are few things that make me as happy as a really good hushpuppy.  Frankly, anything involving perfectly fried, salty carbohydrates has my immediate attention.  Recently, I put out a call on my FaceBook page for a good recipe and my Aunt Betty (my Dad's sister from my epic cooking Mississippi side of the family) obliged with the following:

2 c cornmeal, 1/3 c flour, 2 tables sugar, chopped onion, enough b milk to make it stick together, fry in hot grease. When they ready they should turn over in the pan. Now does that sound like mamaw's recipe?

She then later specified that it's self-rising flour and self-rising cornmeal, both of which I have in my pantry thanks not to my South East Asian upbringing, but to my deep south roots.  And I have the say, this is a delightfully detailed recipe for one that came out of my Mamaw's kitchen.  I remember digging through scraps of paper and torn envelopes covered in scribbles that, if I concentrated really hard, might look like a list of ingredients (as long as you could do without measurements or complete words).

The Proportions
2 Cups self-rising yellow corn meal mix (no, people, not a box of Jiffy!)
1/2 Cup self-rising flour 
2 Tbs sugar
about 1/2 Cup grated onion
about 1 finely minced jalapeno pepper
enough buttermilk (more about this later) 

The Method
Heat enough oil in a heavy pot (or use a deep fryer) until it reaches 350 degrees.
Mix first three ingredients together in a large bowl. 
Stir in grated onion and minced jalapeno pepper.   
Add enough buttermilk to make a sticky batter type dough. 
Scoop dough out with a spoon and drop into hot oil.
Fry until hushpuppies roll over.
Drain immediately on oil absorbant paper.

The Rules

"Fried food isn't bad.  Bad fried food is bad."  - Emeril Lagasse

Thou shalt have, and hold, thy oil at the right temperture: Start it at a little above 350 degrees so that, as you quickly drop in your blobs of goodness, the temp stays in the 350 vicinity.

Thou shalt use enough oil:  I use a cast iron dutch oven filled with about four inches of oil (I used a combo of vegetable and corn oil for this batch).  You want enough oil for the hushpuppies to float and bob around freely, cooking evenly.  This also gives you the magic "I'm done" moment when the hushpuppy turns itself over in the oil.  Flip - out it comes!  Enough oil also helps the oil maintain its temperature.

Thou shalt not crowd thy cooking vessel: Want your oil temperature to plummet, and your crispy-crunchy-moist-on-the-inside miracle to turn into a soggy mess?  Then please, cram as many as you can in at a time.  I generally try to leave at least as much free oil as I have frying items.  If that makes sense.

As with all self-rising buttermilk type items like biscuits and pancakes... thou shalt not overstir.  Unless you like hushpuppies that behave like mini tennis balls.  And you don't.

The Tips
Grated onion and minced jalapenos are not the only things you can add.  At that point you could add anything else you think is yummy in a hushpuppy - like crumbled bacon, or diced cooked shrimp, or ... I don't know ... white truffles or anchovies or whatever.  Me, I like onion and jalapeno.  Period.  Thanks.

And a word about grated onion ... it does wonders for flavoring something like a hushpuppy because the grating releases much more onion juice (ergo flavor) than chopping or mincing does.  Scrape all that soggy goodness into the dry ingredients and mix it up.

What is "enough buttermilk?"  Okay, I apologize for not having a measurement here but I really don't know.  Even when I make the same thing over and over, "enough buttermilk" changes depending on the dry ingredients, the buttermilk, and whether Jupiter is aligned with Mars.  You want it to hold together well in a moist blob that you can scoop and shape easily with a spoon, not runny but not be so dry that you have to roll the batter in your hand to get it to stick together.  Think drop biscuits if that helps.

I promise the next time I make these (and there are going to be so many next times!) I will measure the buttermilk to give you at least a ball park idea. 


Monday, May 16, 2011

The Adventure Continues

On July 28, 2009 I shared the following note on FaceBook - New Adventures: Background for The Curious in which I explained why I was leaving corporate work and what I intended to pursue instead: teaching.

It has been a fascinating almost two years. 

I have learned a lot about myself, my family, my camera settings, my local libraries, farmers markets and schools.  A lot of my time has been spent working as Gabriel's champion in a world and an educational system that isn't designed with him in mind.  At all.  Ever.  I painted our house in Texas, and cleaned and dealt with competing flooring bids and learned that caulk is my friend, not my foe.  I packed and pitched and sold and consolidated all of us (more or less) into a much smaller apartment in Tulsa and rented out our house in Texas.  I cooked a lot.  I fell in love with Tulsa.

I worked on my teaching certification.  I fell into working as a visual impairment coach for a second grade girl and discovered a wonderful world with her.  I watched the country decide, state by state, that the miserable few dollars they allot to education was too much and saw thousands of educators laid off as a result.

I watched our financial reserves dwindle down to ... hey ... wait, I just found a quarter!

So I started looking for work where I knew I could have the most success - back in pure HR.  And I applied for this and for that and wasn't very excited about any of it, except that it beat living off of the change in the couch.  And I interviewed and I didn't like them and they didn't like me and on and on it went.  I said, "Hey, Universe.  I need to do something here so ... I'm just going to keep trucking and you figure out where it is I'm supposed to go."

And then it happened.  After months of applications that took companies weeks if not months to respond to (if they responded at all), I saw a job that was too perfect for me.  If you took my resume and wrote a job description, you would have ended up with this job.  And with a good company.  In Tulsa.  I applied and prepared to be ignored or wait weeks but before I had even had time to move on to the next application, I got a call.  And an interview - immediately. 

Then the next day another call, and a scheduled interview on the phone.  Then, in rapid succession two more phone interviews and an invitation to go to headquarters in the Denver area for final interviews.  My scheduled five interviews that day turned into seven during the course of the day as the Global Head of HR and one of the legal team were added to the schedule.  And one business day later ... a job offer that literally left me breathless.  Oh wait, I found enough breath to say "Yes, please!"  And the best part is - they are at least as excited as I am, perhaps more so.

So it goes, so it goes.  I started my new job today.  I am impressed with the company, with my manager, my team, my senior leader.  The location is good, the job is interesting, the resources are excellent.  For now, I'm back in corporate America and hopefully in a place and a time where it makes sense.

Sunday, May 15, 2011

On cooking and recipes...

I thought that, for those who aren't already used to being frustrated at getting an "ummmmm..." in return for a polite request for a recipe, I would take a moment to explain food, cooking, recipes and where they fit in my world.

By the time I was able to get my nose up to the counter, my Mom had me cooking and marketing for good food.  I say marketing, not shopping, because I was born and raised in South East Asia and many of my earliest memories involve trolling the early morning wet markets for fresh ingredients. 

Chicken?  Yes, I'll take that reddish brown hen over there, running around in the corner - she looks healthy.  Then off to pick out vegetables so fresh sometimes there was damp dirt still clinging to roots.  Fish only if it looked like it still had a flop or two left in it.  Need some pork?  It came off of a freshly butchered pig that still looked just like the animal pork comes from, and spices were ground while you waited for you custom blend.  "Curry for lamb, ah?" and the Serganoon Road spice seller would shuffle around his burlap bags of whole spices concocting the best mix for you before grinding it under your sneezing nose. I didn't grow up in a world where spices came out of a red and white can, vegetables from a stay fresh freezer bag, or meat from a row of uniform plastic wrapped trays.  Oh hey, we need to get back to the chicken guy, I bet our bird is ready to go home - featherless, innardless, lifeless but otherwise intact from beak to claws.

I grew up understanding and appreciating that which all of our food comes from: the earth, the ocean, the lives, the labor and art of harvesting and butchering. 

I also grew up in a food loving family and a family who loved through food.  Not fancy food, just real good eats.  I grew up surrounded by the best of not just South East Asia, but the American Deep South from my father's family roots and the American Mid-West from my mother's side.  I moved to the United States the summer of my eighteenth birthday, a US citizen who had never lived here before.  My introduction to local food was horrifying since it came in the form of the worst sort of college cafeteria food. If it had not been for the kitchens full of cooks in my extended family of relatives and friends, I may have concluded that there was no edible food in these United States. 

What I know how to cook, really know, I learned from watching cooks who didn't measure and whose recipe collection existed between their ears or, if it was complicated, was represented by a collection of yellowed paper scraps and index cards that may, or may not, come complete with detailed instructions or precise amounts ... or amounts at all, for that matter.  Mothers, grandmothers, aunts, uncles, cousins, roommates, in-laws and out-laws - they all taught me a different style, a different art of cooking.

Somewhere along the way, I fell in love with cookbooks.  And there are a different set of things I cook that I learned from books and formal recipes.  When I share those, I'll be sure to explain where the recipe originated.  I'm a big fan of citing my sources (one too many rounds of graduate school, I supsect).  

As I got older I also became more and more concerned with the decrease of real food and the increase of food science.  I started making more basics from scratch when I could: granola, biscuit mix, bread and found that not only were they cheap and easy, they beat the commercial options to smack and back on taste.

All of these influences have woven together over the years and made cooking and sharing what I have made with my own hands a way of living and loving: a celebration of life, family, friends, and an appreciation of all the world has to offer.  Which isn't to say I don't have Doritos for dinner or coffee (just coffee, thanks) for breakfast some days.  

L'chaim!

Sunday, May 8, 2011

The Basics: Granola

Years ago, I picked up a 1973 Los Angeles Times Natural Foods Cookbook for $1.10 ... or at least that's the price that is penciled on the inside cover.  Over the years it has inspired and educated (I don't think I'll ever make an edible soy loaf and I'm okay with that).

One of the inspiration recipes is for granola.  I'm not going to post it here though.  Don't get me wrong, it's a great recipe if you like your granola to be more oat brittle candy than muesli.  While it did not become my go to recipe for granola, it taught me how to make granola.  My husband and I both love the stuff and it's stupidly expensive to purchase.  It is also frequently very high in sugar, fat, and all manner of unpronounceable additives.  What if I just wanted grains and nuts with a little edge of sweet?  Could I do that?  Well, yes, it turns out I could ... and even better ... it was easy and cheap.

The Proportions
10  Cups of old fashioned rolled oats (or any rolled grain you like)
  2  Cups of coarsely chopped almonds (or any other nut you like)
1/2 Cup oil
1/2 Cup honey  

The Method
Mix the grains and nuts together in a large pan (I use my big turkey roaster). 
Simmer oil and honey in a small pot over medium heat until it just comes to a boil.
Drizzle oil and honey mixture over grains and nuts. 
Toss to coat evenly.
Bake in a 250 degree oven for about one hour, stirring every 15 minutes.  Bake until a deep golden brown, remove from oven, dump onto a large cookie sheet and let cool completely before storing in airtight containers. 

The Tips
Good rolled oats, once well toasted, are sweet in and of themselves.  You do not need a lot of added sugars to make great granola.  Having said that, play around with the proportions of oil/sweeter to grains/nuts until you find what you like.  You can make everything from granola candy to toasted oats following this general method.

Some people love dried fruit in their granola.  We're some people.  Never bake the dried fruit in your granola, unless you are trying to establish a college fund for your dentist's children. 

Play around with sweetener options - brown sugar, molasses, different types of honey, agave nectar, maple syrup.  The batch I made tonight is oat and almond with honey and agave nectar.  Tomorrow I'll eat some with fresh blueberries and thick yogurt.  Mmm... 

Saturday, May 7, 2011

And a one, and a two...

After a combination of resisting the overwhelming urge to punch FB in its elusive face over the dysfunctional Notes feature and listening to the endless refrain of "start a blog start a blog" from some of my friends, I bring you ... My Blog.

I'm not entirely sure what I will do with it. I'm positive I will be erratic about whatever it is. I'll probably post about my adventures in fooding, parenting and working, or not working as the case may be. There will be pictures.

To those of you who wanted me to do this ... um ... here it is in its infancy.

I don't even know what to do with most of what Blogger has now made possible. Anyone who wants to enlighten me or make suggestions is welcome to do just that. If you want to correct my grammar or spelling you can go soak your head. (I'm also determined to keep my language clean and resurrect as many of the G rated alternatives from my childhood as I can recall.)

By the way ... I need a really great hush puppy recipe. Anyone? Anyone?